|
|||||||
| Off Topic Off Topic - General non-Corvette related discussion. |
 |
|
|
Share | Thread Tools | Search this Thread |
 01-11-2016, 5:47pm
|
#1 | ||||||
|
Sparkles Flambeaux
Barn Stall Owner #4 Barn Raising I,II NCM Supporter '13,'14,'15,'16,'17,'21 Bantayan Kids '13,'14,'15,'17 

Join Date: Jan 2011
Location: Santa Fe, NM
Posts: 61,466
Thanks: 11,772
Thanked 33,025 Times in 14,165 Posts
Gameroom Barn Bucks: $17500122
|
all righty, listen up. SilverBullitt needs to get some drawers made for his new out feed and work table. this is how i made our kitchen drawers (44 of them in the kitchen alone
 ) out of prefinished maple plywood, using pocket screws. ) out of prefinished maple plywood, using pocket screws.some sample pics attached. first is a drawer for our new coffee table (poly still drying) made with dovetails. it takes some skill and some good tools to do that right, and it takes too long. we won't be doing that in this thread. it just shows an alternate if you want to show off.   the other two are a drawer holding hot pads in our kitchen. the large screw heads you see go to the handle. key point is the glides selected, these are full extension Blum glides, exactly 1/2" thick. so the drawer is exactly 1" narrower than the opening in the cabinet. the cabinet is 24" deep, the inside depth, because of the stringer at the back of the cabinet is 23-1/4". so i selected 22" long glides and made the sides of the drawer also 22". they normally come in 2" increments. the sides are a true 3/4" thick plywood, and the cabinet outside width is 13". so the opening is 11-1/2". therefore, the drawer is 10-1/2" wide. the front and back of the drawer are screwed to the sides with pocket screws so the screws are in shear mode (not in tension, that would have them pull out too easily). so the front and back are 1-1/2" less than the drawer width, or 9" in this case. this drawer is 3" high, so just enough room for 2 pocket screws on each end. once you figure out your drawer size and get the pieces all cut, time to cut dados for the bottom. i leave 1/4" of material of the sides/front/back, and in this case, used 1/4" ply, so i cut a 1/4" dado in the sides. it will help if you mark the outsides/insides of the drawer pieces, so you don't cut on the wrong side.  get the dados cut. then measure how big to cut the bottom. in this case, i made the dados 3/8" deep, so the width of the drawer bottom opening is 3/4" less than the width, or 10-1/2 - 3/4 = 9-3/4". likewise, the length of the opening, front to back is 22 - 3/4 = 21-1/4" now, before you go cut the bottom, subtract 1/8" from each of the above, this will let you fit the bottom easier, and give it a little room to expand if it gets humid later. so the bottom in this case would be cut to 21-1/8 x 9-5/8 time to assemble the drawer. i'll wait. good. most glides come with instructions on how to mount them, most tell you to either put them a certain distance from the bottom, or to put them at the center of the height of the drawer. be sure to leave a little room, say 1/8", for the bottom drawer to clear the bottom of the cabinet. any questions? |
||||||

|

|
||||||
|
01-11-2016, 6:25pm
|
#2 | ||||||
|
Barn Stall Owner #79

Join Date: May 2011
Location: King Arthur's Court
Posts: 8,581
Thanks: 2,550
Thanked 2,694 Times in 1,581 Posts
Gameroom Barn Bucks: $955
|
Nice work.
Just curious, why not drive the pocket screws from the other side so that they are not visible under normal operating conditions? Do they need to be tightened periodically? |
||||||
|
|
|
||||||
|
01-11-2016, 6:29pm
|
#3 | |||||||
|
Sparkles Flambeaux
Barn Stall Owner #4 Barn Raising I,II NCM Supporter '13,'14,'15,'16,'17,'21 Bantayan Kids '13,'14,'15,'17
Join Date: Jan 2011
Location: Santa Fe, NM
Posts: 61,466
Thanks: 11,772
Thanked 33,025 Times in 14,165 Posts
Gameroom Barn Bucks: $17500122
|
Quote:
they also sell pocket screw hole plugs, that you can put in the pocket holes to hide the pocket screws. Mrs. DAB decided to pass on those, as they normally sit proud and you have to sand them flush. that wouldn't work on pre-finished plywood. |
|||||||
|
|
|
|||||||
| The Following User Says Thank You to DAB For This Useful Post: |
|
01-11-2016, 8:34pm
|
#4 | ||||||
|
Barn Stall Owner #13
Barn Raising II,III,IV NCM Supporter '13,'14,'16,'17,'19,'20 Bantayan Kids '13,'15,'17 GTMS 18

Join Date: Jan 2012
Location: Ypsilanti, Mi
Posts: 13,301
Thanks: 7,793
Thanked 2,641 Times in 1,956 Posts
Gameroom Barn Bucks: $425244
|
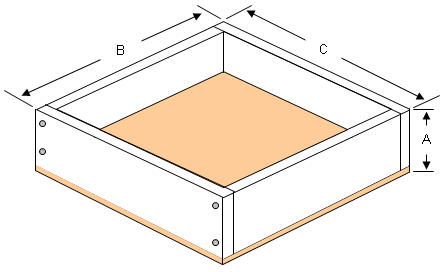 For utility drawers I just run the screws in from the exterior of the sides into the front and back panels - imagine side "B" is the face |
||||||
|
|
|
||||||
| The Following User Says Thank You to Black94lt1 For This Useful Post: |
|
01-11-2016, 8:52pm
|
#5 | |||||||
|
Sparkles Flambeaux
Barn Stall Owner #4 Barn Raising I,II NCM Supporter '13,'14,'15,'16,'17,'21 Bantayan Kids '13,'14,'15,'17
Join Date: Jan 2011
Location: Santa Fe, NM
Posts: 61,466
Thanks: 11,772
Thanked 33,025 Times in 14,165 Posts
Gameroom Barn Bucks: $17500122
|
Quote:
|
|||||||
|
|
|
|||||||
| The Following User Says Thank You to DAB For This Useful Post: |
|
01-11-2016, 8:57pm
|
#6 | |||||||
|
Barn Stall Owner #68
NCM Supporter '11 Bantayan Kids '14,'15

Join Date: Oct 2009
Location: Global Warming FTMFW!!
Posts: 14,312
Thanks: 4,632
Thanked 2,573 Times in 1,706 Posts
Gameroom Barn Bucks: $79329724
|
Quote:

|
|||||||
|
|
|
|||||||
| The Following User Says Thank You to CertInsaneC5 For This Useful Post: |
|
01-11-2016, 9:03pm
|
#7 | |||||||
|
Sparkles Flambeaux
Barn Stall Owner #4 Barn Raising I,II NCM Supporter '13,'14,'15,'16,'17,'21 Bantayan Kids '13,'14,'15,'17
Join Date: Jan 2011
Location: Santa Fe, NM
Posts: 61,466
Thanks: 11,772
Thanked 33,025 Times in 14,165 Posts
Gameroom Barn Bucks: $17500122
|
Quote:
Could not also add a dab of glue, as the plywood already had a finish on it. But if you are using raw wood, you could. And I would. |
|||||||
|
|
|
|||||||
|
01-11-2016, 9:31pm
|
#8 | |||||||
|
Barn Stall Owner #13
Barn Raising II,III,IV NCM Supporter '13,'14,'16,'17,'19,'20 Bantayan Kids '13,'15,'17 GTMS 18
Join Date: Jan 2012
Location: Ypsilanti, Mi
Posts: 13,301
Thanks: 7,793
Thanked 2,641 Times in 1,956 Posts
Gameroom Barn Bucks: $425244
|
Quote:
|
|||||||
|
|
|
|||||||
|
01-11-2016, 9:44pm
|
#9 | ||||||
|
Vette Barn Regular


|
Awesome advice, as usual, DAB. I'm sure this will be a big help to me. I hadn't considered building the drawers out of 3/4 stock because I just thought they'd be too heavy and cumbersome, especially since a couple of them will be about 22" wide. I guess the same principles would apply if I used 1/2 inch plywood stock? (assuming I can find one of the micro kreg jigs to use for the pocket holes)
Thanks so much for taking the time to do this for me. Very kind of you to help a newbie. I'm having to figure everything else out by trial and error. |
||||||
|
|
|
||||||
|
01-11-2016, 9:45pm
|
#10 | |||||||
|
Sparkles Flambeaux
Barn Stall Owner #4 Barn Raising I,II NCM Supporter '13,'14,'15,'16,'17,'21 Bantayan Kids '13,'14,'15,'17
Join Date: Jan 2011
Location: Santa Fe, NM
Posts: 61,466
Thanks: 11,772
Thanked 33,025 Times in 14,165 Posts
Gameroom Barn Bucks: $17500122
|
Quote:
|
|||||||
|
|
|
|||||||
|
|
|
Support the Barn: |
Download the Mobile App; |
Follow us on Facebook: |
||
|
|
|
|


 Submit to Reddit


