Choose your color scheme:
The Vette Barn  
 
Go Back   The Vette Barn > Off Topic/Babes/Other > Off Topic
Register Photo Albums Today's Posts Search Experience

Off Topic Off Topic - General non-Corvette related discussion.

User Tag List

Reply
 
Share Thread Tools Search this Thread
Old 04-23-2024, 1:24pm   #261
C3C7NIC
Barn Stall Owner #102
Points: 32,126, Level: 100
Activity: 14.7%
 
C3C7NIC's Avatar
 
Join Date: Mar 2019
Location: USA
Posts: 15,503
Thanks: 8,983
Thanked 14,275 Times in 4,372 Posts
Gameroom Barn Bucks: $23243
Default

Quote:
Originally Posted by Kevin68 View Post
You're not going to want to hear this, but I'm pretty sure that the upper dash pad HAS to go in first.

There is a pot metal brace that spans between the lower corners of the windshield. There are two cage nuts welded into in the birdcage on each side to bolt this brace in.

The top dash has clips at the front that slide over the lower windshield frame where it is spot welded to the firewall. The top dash is screwed from underneath through the brace and into the top dash. If your lower dash pads are in (and if you have AC...yikes), I don't think you you are going to get all (or any) of those screws in and the top dash will only be secured by the clips and the screws through the lower dash. You would need one long-ass magnetic screwdriver and not touch anything to knock the screw off while threading it blind through a maze of ductwork and wire. Plus, I'd bet at least one to three would be completely inaccessible because they would be blocked by the speedo, tach and/or top vent. Without the screws, I would worry that it will warp or rattle.

You should be OK with the column out as long as the brake/clutch are in and the column brackets are in. If the column was in and dropped you wouldn't have to worry about stabbing the column through the firewall and making sure what goes above and below it are in the correct place. You could also connect the harness to the column wiring without having to do it on your back.

Markids77 comment is a good reminder to get everything behind it tucked in and secured, but I don't think the left side is going to just slide with no resistance. Some part of the left dash assembly is going to be touching something behind it. You're going to have to push a little, and as I said above, use your judgement. It'll take multiple attempts to figure out the source of the resistance.

If the column was in and you hung it with longer than stock bolts it'll support the dash pad without having to completely remove it to make adjustments. it only needs to be lowered a couple or three inches. Without the column in you might consider not connecting the key, headlights and speedo/tach cables on the first dozen or so tries until you are pretty sure you've got everything out of the way and have enough space for the harness plugs when connected. That'll save you from connecting and disconnecting those a bunch of times.
Superb input.

We are waiting for a HOT day to put the dash on. Aware it has to go first but thanks for confirming!

We also need to change all the bulbs and check wires.

We had vintage air installed so lots of vents to deal with and duct hoses they weren’t there before.

I’m aware that that upper center console pot metal part breaks OFTEN! Have thought about adding thin metal support as suggested in other forums. This has to happen but we keep putting it off because quite honestly we are scared. 😱 🤪😂🤣
C3C7NIC is offline   Reply With Quote
Old 04-23-2024, 2:07pm   #262
Kevin68
Vette Barn Crew
Points: 1,649, Level: 24
Activity: 16.9%
 
Kevin68's Avatar
 
Join Date: Sep 2023
Location: Blanco County, TX
Posts: 398
Thanks: 103
Thanked 344 Times in 156 Posts
Gameroom Barn Bucks: $500
Default

Quote:
Originally Posted by C3C7NIC View Post
Superb input.

We are waiting for a HOT day to put the dash on. Aware it has to go first but thanks for confirming!

We also need to change all the bulbs and check wires.

We had vintage air installed so lots of vents to deal with and duct hoses they weren’t there before.

I’m aware that that upper center console pot metal part breaks OFTEN! Have thought about adding thin metal support as suggested in other forums. This has to happen but we keep putting it off because quite honestly we are scared. 😱 🤪😂🤣

I've taken mine in and out a half dozen times over the years and never broke it or felt like it was going to break. Just be gentle with it.

Edit: Because you are not trying to wedge it between the left and right pads, there really shouldn't be much stress on it when you install it. I could see it snapping if you tried to hold it horizontally at the top only with all the gauges in, but you're not going to do that...your going to hold by the top and bottom at the same time all times, right? c'mon we need you to nod yes....
Kevin68 is offline   Reply With Quote
The Following User Says Thank You to Kevin68 For This Useful Post:
Old 04-23-2024, 5:39pm   #263
C3C7NIC
Barn Stall Owner #102
Points: 32,126, Level: 100
Activity: 14.7%
 
C3C7NIC's Avatar
 
Join Date: Mar 2019
Location: USA
Posts: 15,503
Thanks: 8,983
Thanked 14,275 Times in 4,372 Posts
Gameroom Barn Bucks: $23243
Default

Quote:
Originally Posted by Kevin68 View Post
I've taken mine in and out a half dozen times over the years and never broke it or felt like it was going to break. Just be gentle with it.

Edit: Because you are not trying to wedge it between the left and right pads, there really shouldn't be much stress on it when you install it. I could see it snapping if you tried to hold it horizontally at the top only with all the gauges in, but you're not going to do that...your going to hold by the top and bottom at the same time all times, right? c'mon we need you to nod yes....


I’m nodding Kevin! 😂😂😂
C3C7NIC is offline   Reply With Quote
The Following 2 Users Say Thank You to C3C7NIC For This Useful Post:
Old 04-24-2024, 11:44am   #264
C3C7NIC
Barn Stall Owner #102
Points: 32,126, Level: 100
Activity: 14.7%
 
C3C7NIC's Avatar
 
Join Date: Mar 2019
Location: USA
Posts: 15,503
Thanks: 8,983
Thanked 14,275 Times in 4,372 Posts
Gameroom Barn Bucks: $23243
Default

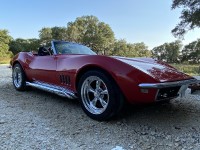
Front chrome bumper installed. Lining up the bolts is no easy task. I think the gaps look pretty good.

Bumper has some mild pitting, don’t really care at this point, it’s a driver. Something we can deal with later if we lose sleep over it. Also need to buff paint still but can do that with bumpers in place. 🫣

Also got gas cover installed.

Kevin (our Anatolian pup) is a great shop supervisor. Ignore the mess. We have parts all laid out on tables/on floor.

Click image for larger version

Name:	IMG_3874.jpg
Views:	7
Size:	569.0 KB
ID:	100656

Click image for larger version

Name:	IMG_3860.jpg
Views:	0
Size:	1.13 MB
ID:	100657
C3C7NIC is offline   Reply With Quote
The Following 8 Users Say Thank You to C3C7NIC For This Useful Post:
Old 04-26-2024, 5:29pm   #265
C3C7NIC
Barn Stall Owner #102
Points: 32,126, Level: 100
Activity: 14.7%
 
C3C7NIC's Avatar
 
Join Date: Mar 2019
Location: USA
Posts: 15,503
Thanks: 8,983
Thanked 14,275 Times in 4,372 Posts
Gameroom Barn Bucks: $23243
Default

Got front and rear side markers installed, rear taillights (had to splice in ground that was broken). (all new bulbs placed). Some of them were a bitch to get in. That spring that lets you compress and twist to lock the bulb in was 😡 in a couple of lights. But they are ALL IN!

Cleaned with scotch brite pad and dielectric grease applied.

Was too busy and tired to take pictures. Also cleaned up front plastic grilles and all lights got brand new lenses.

We aren’t updating the harness at this time. So far trouble shooting shows wiring has good continuity.

Used a sharpie silver paint pen to touch up silver on front plastic grills, one tab was broken, used 2 part epoxy to fix. Will do “for now”.

Front grill mounting parts were missing, those came in mail today so hopefully parts going in tonight as well.

No matter how small the part, I’m putting Something on the car every night so I feel like progress is being made. Even if I work a 12 hour shift I’ll do something small at least.

Baby steps are still steps. 😬
C3C7NIC is offline   Reply With Quote
The Following 7 Users Say Thank You to C3C7NIC For This Useful Post:
Old 04-26-2024, 7:12pm   #266
markids77
A Real Barner
Points: 22,660, Level: 100
Activity: 11.5%
 
markids77's Avatar
 
Join Date: Aug 2013
Location: sweatin' on the oldies
Posts: 13,815
Thanks: 8,244
Thanked 3,864 Times in 2,225 Posts
Gameroom Barn Bucks: $1000483
Default

My avatar car is proof you can build one 20 minutes at a time. Many lunch hours were spent turning wrenches.
You go girl! (And hubbs as well!)
markids77 is offline   Reply With Quote
The Following 4 Users Say Thank You to markids77 For This Useful Post:
Old 04-27-2024, 7:29am   #267
C3C7NIC
Barn Stall Owner #102
Points: 32,126, Level: 100
Activity: 14.7%
 
C3C7NIC's Avatar
 
Join Date: Mar 2019
Location: USA
Posts: 15,503
Thanks: 8,983
Thanked 14,275 Times in 4,372 Posts
Gameroom Barn Bucks: $23243
Default

Quote:
Originally Posted by markids77 View Post
My avatar car is proof you can build one 20 minutes at a time. Many lunch hours were spent turning wrenches.
You go girl! (And hubbs as well!)


Thanks for the vote of confidence! We are just inexperienced so it is rather intimidating. 😜

I have asked so many utterly stupid questions; that the AIM doesn’t make clear. It’s definitely a steep learning curve.
C3C7NIC is offline   Reply With Quote
The Following User Says Thank You to C3C7NIC For This Useful Post:
Old 04-27-2024, 2:12pm   #268
C3C7NIC
Barn Stall Owner #102
Points: 32,126, Level: 100
Activity: 14.7%
 
C3C7NIC's Avatar
 
Join Date: Mar 2019
Location: USA
Posts: 15,503
Thanks: 8,983
Thanked 14,275 Times in 4,372 Posts
Gameroom Barn Bucks: $23243
Default

More parts went on today. We repaired some grounds etc but most of the original wiring was in good shape.

Cleaned and costed all bulbs/electrical plugs with DE grease. Need to plug stuff in and start checking lights/electrical.

Considered the red or yellow top battery but have heard they aren’t worth the $$$ to just get one at Walmart. Thoughts?


Click image for larger version

Name:	IMG_3916.jpg
Views:	0
Size:	972.2 KB
ID:	100847


Click image for larger version

Name:	IMG_3919.jpg
Views:	0
Size:	765.3 KB
ID:	100848


Click image for larger version

Name:	IMG_3922.jpg
Views:	0
Size:	755.6 KB
ID:	100849


Click image for larger version

Name:	IMG_3923.jpg
Views:	0
Size:	782.5 KB
ID:	100850


Click image for larger version

Name:	IMG_3918.jpg
Views:	1
Size:	797.6 KB
ID:	100851
C3C7NIC is offline   Reply With Quote
The Following 3 Users Say Thank You to C3C7NIC For This Useful Post:
Old 04-27-2024, 4:41pm   #269
Rodnok1
A Real Barner
Points: 42,945, Level: 100
Activity: 46.0%
 
Rodnok1's Avatar
 
Join Date: Apr 2019
Location: North Carolina
Posts: 17,354
Thanks: 4,952
Thanked 23,974 Times in 9,963 Posts
Gameroom Barn Bucks: $315482
Default

Optima years ago were top notch, company was sold number of years ago and quality is not there now, especially for the money.
Rodnok1 is offline   Reply With Quote
Old 04-27-2024, 7:27pm   #270
LATB
A Real Barner
Points: 123,478, Level: 100
Activity: 99.0%
 
LATB's Avatar
 
Join Date: Jan 2011
Location: Green Acres is the place to be...
Posts: 37,630
Thanks: 6,356
Thanked 23,580 Times in 10,686 Posts
Gameroom Barn Bucks: $8122190
Default

Looks like you are doing a fine job with it.

Name:  IMG_9102.jpeg
Views: 61
Size:  96.6 KB

Please try to get all the trim pieces around the grills lined up nicely.
Bugs the chit out of me how many C3’s I see with those pieces all jacked up. Even on some high dollar C3’s for sale.
LATB is offline   Reply With Quote
Old 04-27-2024, 9:58pm   #271
markids77
A Real Barner
Points: 22,660, Level: 100
Activity: 11.5%
 
markids77's Avatar
 
Join Date: Aug 2013
Location: sweatin' on the oldies
Posts: 13,815
Thanks: 8,244
Thanked 3,864 Times in 2,225 Posts
Gameroom Barn Bucks: $1000483
Default

Quote:
Originally Posted by C3C7NIC View Post
More parts went on today. We repaired some grounds etc but most of the original wiring was in good shape.

Cleaned and costed all bulbs/electrical plugs with DE grease. Need to plug stuff in and start checking lights/electrical.

Considered the red or yellow top battery but have heard they aren’t worth the $$$ to just get one at Walmart. Thoughts?


Attachment 100847


Attachment 100848


Attachment 100849


Attachment 100850


Attachment 100851
While you are building and just need 12 volts to check function buy the cheapest motorcycle AGM you can find on eBay or wherever. It may be a year or more before you start to drive this regularly, so a "real" battery makes little sense right now. Once you are past systems diagnosis and wiring olympics get a fresh, full size battery and drive happy.
markids77 is offline   Reply With Quote
The Following User Says Thank You to markids77 For This Useful Post:
Old 04-28-2024, 11:53am   #272
C3C7NIC
Barn Stall Owner #102
Points: 32,126, Level: 100
Activity: 14.7%
 
C3C7NIC's Avatar
 
Join Date: Mar 2019
Location: USA
Posts: 15,503
Thanks: 8,983
Thanked 14,275 Times in 4,372 Posts
Gameroom Barn Bucks: $23243
Default

Click image for larger version

Name:	IMG_3928.jpg
Views:	0
Size:	695.0 KB
ID:	100885


Decklid installed this morning. It has already been buffed out.


One more thing off the to do list.
C3C7NIC is offline   Reply With Quote
The Following 3 Users Say Thank You to C3C7NIC For This Useful Post:
Old 04-28-2024, 7:00pm   #273
markids77
A Real Barner
Points: 22,660, Level: 100
Activity: 11.5%
 
markids77's Avatar
 
Join Date: Aug 2013
Location: sweatin' on the oldies
Posts: 13,815
Thanks: 8,244
Thanked 3,864 Times in 2,225 Posts
Gameroom Barn Bucks: $1000483
Default

Quote:
Originally Posted by C3C7NIC View Post
Attachment 100885


Decklid installed this morning. It has already been buffed out.


One more thing off the to do list.
I haven't built a convertible yet... can you install the top with the decklid in place?
markids77 is offline   Reply With Quote
Old 04-28-2024, 7:19pm   #274
C3C7NIC
Barn Stall Owner #102
Points: 32,126, Level: 100
Activity: 14.7%
 
C3C7NIC's Avatar
 
Join Date: Mar 2019
Location: USA
Posts: 15,503
Thanks: 8,983
Thanked 14,275 Times in 4,372 Posts
Gameroom Barn Bucks: $23243
Default

Quote:
Originally Posted by markids77 View Post
I haven't built a convertible yet... can you install the top with the decklid in place?
Good question.

I hope so, but if not, no biggie, only 4 bolts to remove.

Will be getting convertible top redone but that will probably be the last thing to be done. We seldom drive with the top up.
C3C7NIC is offline   Reply With Quote
The Following User Says Thank You to C3C7NIC For This Useful Post:
Old 04-28-2024, 7:23pm   #275
C3C7NIC
Barn Stall Owner #102
Points: 32,126, Level: 100
Activity: 14.7%
 
C3C7NIC's Avatar
 
Join Date: Mar 2019
Location: USA
Posts: 15,503
Thanks: 8,983
Thanked 14,275 Times in 4,372 Posts
Gameroom Barn Bucks: $23243
Default

Click image for larger version

Name:	IMG_3939.jpg
Views:	1
Size:	778.1 KB
ID:	100902

Click image for larger version

Name:	IMG_3936.jpg
Views:	0
Size:	584.3 KB
ID:	100903

Click image for larger version

Name:	IMG_3935.jpeg
Views:	5
Size:	642.2 KB
ID:	100904

Got these installed today. Fresh coat of John Deere blitz black as they had gotten scratched in transit to and from NC.


Had an adorable little garage supervisor. Thing 2 AKA “Tiny Tina”. Size of a 2 yr old but 5 in July. Her sister on the other hand will be over 6’. (Same parents). 😂
C3C7NIC is offline   Reply With Quote
The Following 5 Users Say Thank You to C3C7NIC For This Useful Post:
Old 04-28-2024, 7:52pm   #276
Mick
A Real Barner
Points: 18,119, Level: 93
Activity: 40.3%
 
Mick's Avatar
 
Join Date: Jun 2018
Posts: 7,599
Thanks: 1,969
Thanked 7,105 Times in 3,146 Posts
Gameroom Barn Bucks: $12721
Default

Quote:
Originally Posted by markids77 View Post
I haven't built a convertible yet... can you install the top with the decklid in place?
The top itself? Yes. I replaced the top on my '69 vert, and did not need to remove the decklid. Install the soft-top framework? I've never done that, so I'm not sure. I'm not home right now, so I can't look at my top, but I think the answer is "yes". If I am picturing it in my mind correctly, the "pivot point" where the frame attaches is not far behind the seats, so I believe the deck lid fully open should not get in the way of installing it.
Mick is offline   Reply With Quote
The Following 2 Users Say Thank You to Mick For This Useful Post:
Old 04-28-2024, 8:31pm   #277
C3C7NIC
Barn Stall Owner #102
Points: 32,126, Level: 100
Activity: 14.7%
 
C3C7NIC's Avatar
 
Join Date: Mar 2019
Location: USA
Posts: 15,503
Thanks: 8,983
Thanked 14,275 Times in 4,372 Posts
Gameroom Barn Bucks: $23243
Default

Quote:
Originally Posted by Mick View Post
The top itself? Yes. I replaced the top on my '69 vert, and did not need to remove the decklid. Install the soft-top framework? I've never done that, so I'm not sure. I'm not home right now, so I can't look at my top, but I think the answer is "yes". If I am picturing it in my mind correctly, the "pivot point" where the frame attaches is not far behind the seats, so I believe the deck lid fully open should not get in the way of installing it.
I believe you are correct. They just anchor behind the seats. I believe only 2 points, I was looking at where I’m going to have to cut through the new carpet set for it.
C3C7NIC is offline   Reply With Quote
Old 04-29-2024, 6:39am   #278
RMVette
A Real Barner
Points: 63,996, Level: 100
Activity: 33.5%
 
RMVette's Avatar
 
Join Date: Dec 2019
Location: Matthews, NC
Posts: 17,153
Thanks: 6,266
Thanked 21,863 Times in 9,190 Posts
Gameroom Barn Bucks: $311064
Default

You guys are doing a great job!

Would it be too late to install the headlight shields? They keep the crap off the headlights and black them out inside the grill.... no biggie if not installed...


Name:  1968 Headlights.PNG
Views: 32
Size:  595.7 KB

Click image for larger version

Name:	Headlight Shield 1.PNG
Views:	0
Size:	1.01 MB
ID:	100932

Click image for larger version

Name:	Headlight Shield 2.PNG
Views:	0
Size:	910.1 KB
ID:	100933
RMVette is offline   Reply With Quote
The Following User Says Thank You to RMVette For This Useful Post:
Old 04-29-2024, 9:36am   #279
Kevin68
Vette Barn Crew
Points: 1,649, Level: 24
Activity: 16.9%
 
Kevin68's Avatar
 
Join Date: Sep 2023
Location: Blanco County, TX
Posts: 398
Thanks: 103
Thanked 344 Times in 156 Posts
Gameroom Barn Bucks: $500
Default

Quote:
Originally Posted by Mick View Post
The top itself? Yes. I replaced the top on my '69 vert, and did not need to remove the decklid. Install the soft-top framework? I've never done that, so I'm not sure. I'm not home right now, so I can't look at my top, but I think the answer is "yes". If I am picturing it in my mind correctly, the "pivot point" where the frame attaches is not far behind the seats, so I believe the deck lid fully open should not get in the way of installing it.

It will go in with the deck lid installed, seats folded forward. I didn't bother re- installing mine when I redid the interior. In 16+ years of ownership, I have never put the top up except in the garage. I have a tonneau top to cover the cockpit when parked. Don't know where to get one but I bet a boat cover place could make one. It's the same material, rubberized vinyl (?) over canvas. This one came with the car. Old picture
Attached Thumbnails
IMG_0199.jpg  

Kevin68 is offline   Reply With Quote
The Following 3 Users Say Thank You to Kevin68 For This Useful Post:
Old 04-29-2024, 4:21pm   #280
C3C7NIC
Barn Stall Owner #102
Points: 32,126, Level: 100
Activity: 14.7%
 
C3C7NIC's Avatar
 
Join Date: Mar 2019
Location: USA
Posts: 15,503
Thanks: 8,983
Thanked 14,275 Times in 4,372 Posts
Gameroom Barn Bucks: $23243
Default

Quote:
Originally Posted by RMVette View Post
You guys are doing a great job!

Would it be too late to install the headlight shields? They keep the crap off the headlights and black them out inside the grill.... no biggie if not installed...


Attachment 100931

Attachment 100932

Attachment 100933
Like how this looks.

Not against installing those but weren’t on mine pre resto that I remember.

Not sure if we could install now without removing the grills. Didn’t see any holes Toni stall them when I was under there. I’ll take a better look tonight.


Also that rod you have in the middle, we don’t have that either. Was added later models and mine is an early 68; nose support rod or something.

Odd that there are differences even within the 68 models.
C3C7NIC is offline   Reply With Quote
Reply

The Vette Barn > Off Topic/Babes/Other > Off Topic


Posting Rules
You may not post new threads
You may not post replies
You may not post attachments
You may not edit your posts

BB code is On
Smilies are On
[IMG] code is On
HTML code is Off

Forum Jump


All times are GMT -5. The time now is 10:22pm.


Powered by vBulletin® Version 3.8.4
Copyright ©2000 - 2024, Jelsoft Enterprises Ltd.
User Alert System provided by Advanced User Tagging (Pro) - vBulletin Mods & Addons Copyright © 2024 DragonByte Technologies Ltd.
Copyright © 2009 - 2024 The Vette Barn


Support the Barn:
 
Download the Mobile App;
 
Follow us on Facebook:

Become a Stall Owner


Apple iOS App        Google Android App


Visit our Facebook page