|
|||||||
| C5 Open Discussion General and technical C5 Corvette discussion - ownership, maintenance, repairs, modifications, tuning |
 |
|
|
Share | Thread Tools | Search this Thread |
 01-11-2012, 4:38pm
|
#1 | ||||||
|
Charter Member


Join Date: Oct 2009
Location: Wylie, Texas
Posts: 114
Thanks: 4
Thanked 48 Times in 21 Posts
Gameroom Barn Bucks: $1077
|
Guys:
I installed a new FAST 92mm Intake, and new LS2 Throttle Body this weekend. I hope to get it tuned in the next week or so. I wrote a procedure on the install on my web site. Mark's 2004 Corvette Z06 Scroll down to "Fast 92 intake, and LS2 Throttle Body install" Here are the pictures and descriptions from my web site. Installing a FAST 92mm Intake Manifold, and a LS2 Throttle Body on the C5 Corvette What I got to perform this job: I got a new FAST 92mm Intake Manifold, and send it to SpinMonster for porting and painting flat black. SpinMonster also sealed the intake for me with the FAST provided gasket.  I got a new LS2 Throttle body, and send it to SpinMonster for porting.(Not ported in picture)  I got a new LS2 throttle body wiring harness from Casper Electronics (PN 108115)  You're going to need all the hardware that ships with the FAST intake.  You're going to need the following parts to run a new vacuum line to your intake coupler before your throttle body. The LS1/LS6 Throttle body has a vacuum line already on it. The LS2 Throttle body's does not.   My driver's side valve cover has a Factory GM plug in it. If you have a vacuum line in yours then you should run that line to the intake coupler also.  You're going to need some silicone for the MAP sensor at the back of the FAST intake. You're going to need some contact cement for the air line that goes to the coupler.  You're going to need a throttle body Bypass for the coolant lines. The LS2 Throttle Body does not have these coolant lines.  You're going to need a 3/8" fuel line disconnect tool.  Before starting install.  Remove the Negative (-) battery terminal.  Remove both of the engine covers.  Remove the Air intake from the front of the engine.  Remove the Throttle body.  Take note of the orientation of the lines on the catch can (or stock setup). Disconnect both lines at the intake.  Use the 3/8" fuel line disconnect tool to remove the fuel line. Take my advice and put rubber gloves over the open fuel lines so they don't spill out.  Remove all 8 fuel injector connectors. Lightly push on the metal clip and they come off.  Remove these grey clips by squeezing the back side of them.  Remove this connector at the drivers firewall. Push on the white clip and it comes off.  Remove 8 of the intake bolts. Leave the 2x under the firewall for the next step.  Loosen and lift the 2x intake bolts under the firewall. Put a tie wrap or tape once you lift them slightly. The goal here is NOT to scratch the head sealing surface as you remove the intake.  Disconnect the Grey connector on both sides of the intake.  Disconnect the Brake booster line right at the Brake booster. Its a lot easier than disconnecting it in the rear of the intake..  Best have a friend help on this part. Gently life the intake and move it forward a little. Reach behind it and disconnect the MAP sensor cable, and the 1/8" Vacuum line under the MAP.  Clean and vacuum the entire area. Be careful not to scratch the head sealing surfaces.  Tape off the head ports so that no dirt gets in them.  Clean off the fuel injector tips gently. Lightly oil the o-rings. It makes them slip into the new intake much easier.  Remove the Brake booster line, and the MAP from the old intake.  Use some of the RTV silicon gasket maker and coat the MAP sensor. Install in new intake.  Install the brake booster line into the new intake.  Replace the 10 valley cover bolts with the low profile bolts supplied with the FAST. Replace one bolt at a time and torque to 18 ft/lbs.  Lightly oil the 8 gaskets, and insert into the new intake manifold.  Install the fuel rails. Gently push the injectors into the new intake. Having lightly oiled the o-rings, it should slip in very easliy. Be careful not to "cut" an o-ring. Install the 4x mounting screws that holds down the fuel rail to the intake. 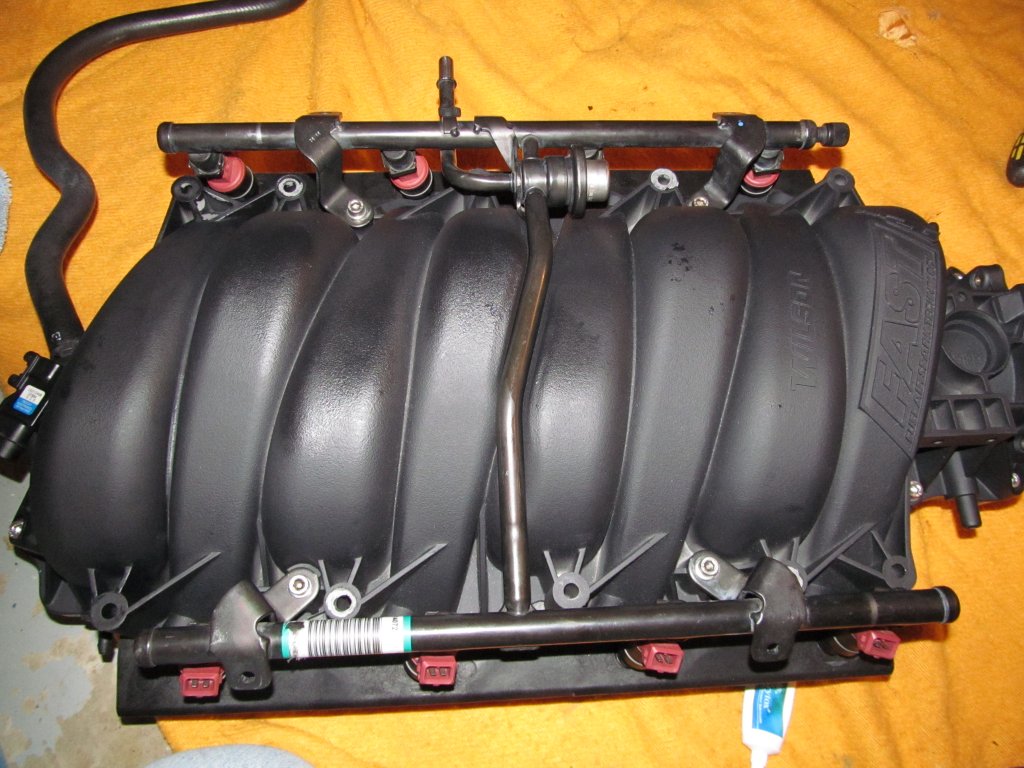 Remove the center cowl plastic plug. The new intake will hit it. Once the intake is in place you can go back and clip the length of the plug and re-install.  The stock 10x intake long bolts reach further into the heads than the bolts suplied by Fast. I used the stock bolts. Put 2x long bolts into intake before you slide it under the cowl. Be sure to lift and tape the 2x bolts so as not to scratch the head seal surface. Before sliding the new intake all the way back be sure to plug in the MAP sensor, and the 1/8" Vacuum line. Route the brake booster line as you slide the intake back into place.  The stock intake had a place where this part mounted to. The new intake does not. We tie wrapped it to the stock wiring, and removed the un-needed bracket. Plug in the 8x injectors, 2x grey connectors, and black connector at drivers firewall.  Plug your catch can, or stock connections back into the manifold.  Start screwing in all 10x intake bolts. Only finger tight to start. Make 2x passes on the torque sequence. 45inch lbs first pass, and 89 inch lbs second and final pass. Follow the sequence listed below for both torque sequences.   Reconnect the fuel line and clip.  Install and route the new LS2 Throttle body Harness.  Install the throttle body gasket into the new intake. Fast did not supply proper throttle body mounting screws so I got 4x 45mm #6 Stainless bolts with washers/lock washers.  Mount the LS2 throttle body, and connect the electrical connections to it.  I installed the air coupler and the rest of the vararam to make sure everything fit right. I also need to determine where to drill the hole for the vacuum line from the passenger side head.  I drilled a 7/8" hole into my air coupler  This is the hose that I put together and used contact cement to connect to my air coupler. Let dry over night to ensure a good seal and fit.  Everything back together. I will later have to shave my stock engine covers to fit the higher Fast Intake.  Double check all connections before connecting the Negative (-) battery terminal. Turn the ignition to the ON position (do not start) for a minute or so. This will allow the fuel to pressurize the fuel rails before ignition. Get your car Dyno tuned because you will be running lean after this install. Enjoy your new FAST intake manifold ! Hope this helps someone out ! Toque |
||||||

|

|
||||||
| The Following User Says Thank You to Toque For This Useful Post: |
|
01-20-2012, 8:51am
|
#2 | ||||||
|
Barn Raising IV


Join Date: Jan 2012
Location: Georgia. Fk polar vortex
Posts: 3,440
Thanks: 1,087
Thanked 709 Times in 413 Posts
Gameroom Barn Bucks: $2412584
|
Correct me if I am wrong, but wouldn't this be a good time to address the oil pressure sender under the intake?
Awesome write up btw 
|
||||||
|
|
|
||||||
|
01-20-2012, 9:24am
|
#3 | ||||||
|
Charter Member
Join Date: Oct 2009
Location: Wylie, Texas
Posts: 114
Thanks: 4
Thanked 48 Times in 21 Posts
Gameroom Barn Bucks: $1077
|
Guys:
I shaved my engine covers and got a perfect fit.  To shave the engine covers you will need the following. I got a 2" drum sanding wheel with 80 Grit sand paper and used my drill.  You can see the BEFORE covers on top, and the AFTER covers on the botttom.  The 2" drum sanding wheel fits very well for the angles I was trying to achieve. What I did was install the cover, make marks where it needed to be sanded, and started sanding. I would then re-install the cover and make more marks where it needed to be sanded, and started sanding again. I continued doing this over and over and over till I got the shape I was looking for. I went slow with it so as not to over sand any given area. I wanted it to look like it was designed to fit the intake from the factory. I made sure that the covers snapped into place and there was adequate clearance around the intake. After I achieved the fit I wanted, I went back and used 400 grit sandpaper smoothed the cut edges.  This is how the Passenger side fits after sanding.  This is how the Driver side fits after sanding.  Ready to hit the streets ! :rock:  Toque |
||||||
|
|
|
||||||
|
01-20-2012, 9:24am
|
#4 | ||||||
|
Charter Member
Join Date: Oct 2009
Location: Wylie, Texas
Posts: 114
Thanks: 4
Thanked 48 Times in 21 Posts
Gameroom Barn Bucks: $1077
|
Here are my actual results.

|
||||||
|
|
|
||||||
|
01-20-2012, 9:25am
|
#5 | |||||||
|
Charter Member
Join Date: Oct 2009
Location: Wylie, Texas
Posts: 114
Thanks: 4
Thanked 48 Times in 21 Posts
Gameroom Barn Bucks: $1077
|
Quote:
I suppose it would be a good time to address the oil pressure sender. I don't have any issues though... (luckily). Toque |
|||||||
|
|
|
|||||||
|
01-12-2013, 2:01pm
|
#6 | ||||||
|
Barn Stall Owner #1962


Join Date: Aug 2011
Location: Henderson, NV
Posts: 1,464
Thanks: 498
Thanked 572 Times in 327 Posts
Gameroom Barn Bucks: $251407
|
Is there any real benefit to this setup on an LS1 with only a cold air intake and LG long tubes, high flow cats, and exhaust? Otherwise stock heads/cam with an A4. Not sure what your other mods were at the time of this install. I saw on your website several other items installed as well. I may see a peek of long tubes in your install pictures.
|
||||||
|
|
|
||||||
|
01-19-2013, 9:28pm
|
#7 | |||||||
|
Charter Member
Join Date: Oct 2009
Location: Wylie, Texas
Posts: 114
Thanks: 4
Thanked 48 Times in 21 Posts
Gameroom Barn Bucks: $1077
|
Quote:
 Your gains are all going to depend on your other supporting mods. If you have an LS1 intake then yea you should see some impressive gains. Your heads and cam sound like your bottleneck at this time. Here are how my mods progressed over the last 9 years. 
|
|||||||
|
|
|
|||||||
|
01-21-2013, 3:02pm
|
#8 | |||||||
|
Barn Stall Owner #1962
Join Date: Aug 2011
Location: Henderson, NV
Posts: 1,464
Thanks: 498
Thanked 572 Times in 327 Posts
Gameroom Barn Bucks: $251407
|
Quote:
Mine is a 2003 so the intake is as good as it gets for an LS1. I don't really have any plans to do heads/cam, just improve where I can externally. |
|||||||
|
|
|
|||||||
|
02-24-2016, 1:53am
|
#9 | ||||||
|
Mirroredskirts

Join Date: Jan 2011
Posts: 7,640
Thanks: 1,668
Thanked 1,918 Times in 1,137 Posts
Gameroom Barn Bucks: $25530859
|

|
||||||
|
|
|
||||||
|
|
|
Support the Barn: |
Download the Mobile App; |
Follow us on Facebook: |
||
|
|
|
|


 Submit to Reddit


