|
|||||||
| C4 Open Discussion General and technical C4 Corvette discussion - ownership, maintenance, repairs, modifications, tuning |
 |
|
|
Share | Thread Tools | Search this Thread |
 06-28-2011, 6:35pm
|
#41 | ||||||
|
A Real Barner


Join Date: Jan 2011
Location: Houston TX
Posts: 1,176
Thanks: 557
Thanked 164 Times in 88 Posts
Gameroom Barn Bucks: $3699
|
This place offers good automotive grade wires in 5 foot minimum lengths and factory colors. They also offer high heat tape and loom.
EFI Connection - Item Details These connectors will work with the LS1 ECM. There will be half as many solder joints by using these. 20ga wires --- 12084913-L Delphi Connection Systems Automotive Connectors 18ga wires --- 12084912-L Delphi Connection Systems Automotive Connectors |
||||||

|

|
||||||
| The Following User Says Thank You to Ch@0s For This Useful Post: |
|
07-11-2011, 7:42pm
|
#42 | ||||||
|
A Real Barner
Join Date: Jan 2011
Location: Houston TX
Posts: 1,176
Thanks: 557
Thanked 164 Times in 88 Posts
Gameroom Barn Bucks: $3699
|
The engine is finally in for good. I had to redo the wiring bulkhead because the engine was too close. The wires all had to be routed out of the top portion of the bulkhead to clear. Now I can start putting it together.
 |
||||||
|
|
|
||||||
|
07-11-2011, 10:12pm
|
#43 | ||||||
|
A Real Barner


Join Date: Jan 2011
Location: Oklahoma City, OK
Posts: 4,030
Thanks: 1,992
Thanked 1,418 Times in 706 Posts
Gameroom Barn Bucks: $882805
|
Looking good

|
||||||
|
|
|
||||||
| The Following User Says Thank You to C4fan For This Useful Post: |
|
07-12-2011, 8:03pm
|
#44 | ||||||
|
A Real Barner
Join Date: Jan 2011
Location: Houston TX
Posts: 1,176
Thanks: 557
Thanked 164 Times in 88 Posts
Gameroom Barn Bucks: $3699
|
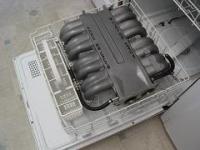
I test fit my manifolds this afternoon. They fit great, I was so happy I for got to take pictures. I did snap a few of them painted with POR-15 Manifold Grey.
I'm still not very sure about the color but I could always have them coated later. |
||||||
|
|
|
||||||
|
07-30-2011, 9:39pm
|
#45 | ||||||
|
A Real Barner
Join Date: Jan 2011
Location: Houston TX
Posts: 1,176
Thanks: 557
Thanked 164 Times in 88 Posts
Gameroom Barn Bucks: $3699
|
This weekend I installed my exhaust manifolds. They fit great!! the hardest part was figuring out what size the bolts were because I had none. I found an ACE hardware that had grade 8 flange head bolts 8mm X 1.25 X 30 with a 10mm head ..$1.20 each, they only had 8 so I have to wait a week for the other 4.
|
||||||
|
|
|
||||||
|
08-06-2011, 9:11pm
|
#46 | ||||||
|
A Real Barner
Join Date: Jan 2011
Location: Houston TX
Posts: 1,176
Thanks: 557
Thanked 164 Times in 88 Posts
Gameroom Barn Bucks: $3699
|
I worked really hard on the PS/Alt bracket today. Believe it or not the PS pressure line will bolt right up after you spend 2 hours tweaking it.
 I used the closed end of a 17mm wrench and my bare hands to work it slowly in place. It takes time and patience not to kink it. The bracket fit well it took 4 bolts 3 10X1.5 X70 MM flange head bolts I found at ACE hardware for 2.69 and one 10X1.5 X60 MM at the bottom 2.10. To hold the alternator in place I got 2 10X1.5 X100MM bolts and a couple of washers. |
||||||
|
|
|
||||||
|
08-07-2011, 12:03am
|
#47 | ||||||
|
A Real Barner
Join Date: Jan 2011
Location: Oklahoma City, OK
Posts: 4,030
Thanks: 1,992
Thanked 1,418 Times in 706 Posts
Gameroom Barn Bucks: $882805
|
 Dude your car is going to be awsome. Keep keeping us posted. Dude your car is going to be awsome. Keep keeping us posted.
|
||||||
|
|
|
||||||
| The Following User Says Thank You to C4fan For This Useful Post: |
|
11-21-2011, 3:51pm
|
#48 | ||||||
|
A Real Barner
Join Date: Jan 2011
Location: Houston TX
Posts: 1,176
Thanks: 557
Thanked 164 Times in 88 Posts
Gameroom Barn Bucks: $3699
|
Ok, back to work. It took me a a while but I finally got the converter I needed.
Its a CDS 3500 built for N0S. I don't know if I ever mentioned this before but the long term plan is to spray a 100-150 shot on track days. I'm off this week we have a few things planned but otherwise its vette week. |
||||||
|
|
|
||||||
|
11-21-2011, 5:54pm
|
#49 | ||||||
|
A Real Barner

Join Date: Jan 2011
Location: Ventura County
Posts: 2,807
Thanks: 1,228
Thanked 225 Times in 135 Posts
Gameroom Barn Bucks: $460853
|

|
||||||
|
|
|
||||||
|
11-23-2011, 5:09pm
|
#50 | ||||||
|
A Real Barner
Join Date: Jan 2011
Location: Houston TX
Posts: 1,176
Thanks: 557
Thanked 164 Times in 88 Posts
Gameroom Barn Bucks: $3699
|
After 2 days of working on it pretty much non stop I have learned two things. One, Putting in a transmission with out a rack and only 13" off the ground is very hard. Two, I'm not as young as I once was.
I got the trans mission in place and I'm headed back to modify the C-beam. Its off by about a half inch. Here are a couple of pictures of the trans and one of the C-beam holes. |
||||||
|
|
|
||||||
|
11-23-2011, 7:30pm
|
#51 | ||||||
|
A Real Barner
Join Date: Jan 2011
Location: San Marcos, Ca
Posts: 1,959
Thanks: 184
Thanked 279 Times in 194 Posts
Gameroom Barn Bucks: $2013824
|
^^^ so about the width of the adapter plate it seems.
|
||||||
|
|
|
||||||
|
11-23-2011, 8:54pm
|
#52 | ||||||
|
A Real Barner
Join Date: Jan 2011
Location: Houston TX
Posts: 1,176
Thanks: 557
Thanked 164 Times in 88 Posts
Gameroom Barn Bucks: $3699
|
It's in!! Right now the Engine, transmission, C-beam, and rear end are mated and everything looks good. This for me is a mile stone. I need to install the drive shaft but I don't see this will be a problem at all. I only had to elongate the C-beam mounting holes .25 inches.
My goal for this week was to be at this point. This weekend I can finally start working on extending my wiring. I'll take some pictures Saturday we are out of town until then. |
||||||
|
|
|
||||||
|
11-26-2011, 9:19pm
|
#53 | ||||||
|
A Real Barner
Join Date: Jan 2011
Location: Houston TX
Posts: 1,176
Thanks: 557
Thanked 164 Times in 88 Posts
Gameroom Barn Bucks: $3699
|
Today I learned the C-beam and drive shaft have to be installed together.
I took the C-beam out to clean it up. I them put it back and could not install the drive shaft. So then I took the C-beam out and put in the drive shaft and could not install the C-beam. Finally i put the C-beam in place and moved it over until I had enough room to install the drive shaft then bolted the C-beam in place. The exhaust lines up pretty good. It looks like the Left/drivers will need to be cut down a little. If I could get a hold off some 98 corvette exhaust the first couple of feet I will be in business. The last picture is the cats I will be using. They will have to be cut down. |
||||||
|
|
|
||||||
|
12-04-2011, 5:12pm
|
#54 | ||||||
|
A Real Barner
Join Date: Jan 2011
Location: Houston TX
Posts: 1,176
Thanks: 557
Thanked 164 Times in 88 Posts
Gameroom Barn Bucks: $3699
|
I have been working on the wiring most of the day. I mocked it up and to my surprise I only need to extend about 20 wires.
I the picture what is circled in red will reach. The bundle in yellow will not. Ok, back to work |
||||||
|
|
|
||||||
|
12-04-2011, 8:34pm
|
#55 | ||||||
|
A Real Barner
Join Date: Jan 2011
Location: Houston TX
Posts: 1,176
Thanks: 557
Thanked 164 Times in 88 Posts
Gameroom Barn Bucks: $3699
|
I'm almost done with the harness.Big props to the wife for letting me turn our workout room into the harness room for the week.I need to extend the wires that were to short and figure out what to do with the 12V commons. I picked up the PCM end of a late model truck harness so I can extend the 19 wires and only have one solder point and hopefully match the colors perfectly.
My mess |
||||||
|
|
|
||||||
|
12-04-2011, 10:45pm
|
#56 | ||||||
|
Barn Stall Owner #120

Join Date: Jan 2011
Location: Southern California
Posts: 10,544
Thanks: 2,212
Thanked 6,079 Times in 2,562 Posts
Gameroom Barn Bucks: $9282448
|

|
||||||
|
|
|
||||||
| The Following User Says Thank You to PLRX For This Useful Post: |
|
12-07-2011, 6:45pm
|
#57 | ||||||
|
Vette Barn Crew


Join Date: Dec 2011
Location: Shillington, PA
Posts: 293
Thanks: 44
Thanked 18 Times in 10 Posts
Gameroom Barn Bucks: $95530
|
Great write up... Enjoying......
|
||||||
|
|
|
||||||
|
12-08-2011, 8:10am
|
#58 | ||||||||
|
A Real Barner
Join Date: Jan 2011
Location: Houston TX
Posts: 1,176
Thanks: 557
Thanked 164 Times in 88 Posts
Gameroom Barn Bucks: $3699
|
Quote:
 Quote:
|
||||||||
|
|
|
||||||||
|
12-10-2011, 11:13am
|
#59 | ||||||
|
A Real Barner
Join Date: Jan 2011
Location: Houston TX
Posts: 1,176
Thanks: 557
Thanked 164 Times in 88 Posts
Gameroom Barn Bucks: $3699
|
I found an awesome site C4 Vette wiring diagrams
https://wiki.bentleypublishers.com/d...agrams19901991 And posted by LS1MCSS .. a very valuable resource schematics - LS1TECH |
||||||
|
|
|
||||||
|
12-10-2011, 5:34pm
|
#60 | ||||||
|
A Real Barner
Join Date: Jan 2011
Location: Houston TX
Posts: 1,176
Thanks: 557
Thanked 164 Times in 88 Posts
Gameroom Barn Bucks: $3699
|
I decided to take a break from the harness today and go shopping. I went to 3 parts houses an found this.
Dayco hoses E80418 and E80406 Dorman fitting for the steam line 785-400 ATC fuse block 5171571. I'm going to run a fuse link to the fuse block and put it right behind the battery. I will post pics up when done. I also test fit the lines cutting off about 1.5" and they fit nicely. |
||||||
|
|
|
||||||
|
|
|
Support the Barn: |
Download the Mobile App; |
Follow us on Facebook: |
||
|
|
|
|


 Submit to Reddit


