|
|||||||
| C4 Open Discussion General and technical C4 Corvette discussion - ownership, maintenance, repairs, modifications, tuning |
 |
|
|
Share | Thread Tools | Search this Thread |
 01-18-2011, 10:52am
|
#1 | ||||||
|
Vette Barn Regular


Join Date: Jan 2011
Location: New Jersey
Posts: 83
Thanks: 5
Thanked 4 Times in 4 Posts
Gameroom Barn Bucks: $946
|
***SEND A PM TO RedLS1GTO IF THERE IS A TECH THREAD THAT YOU THINK SHOULD BE ADDED TO THIS STICKY***
Well, I want to start off the C4 section right, so you guys know what we are doing here... Please post up any useful links or DIY fixes/mods or info like how to shut off the "change oil light"... Lets stay on topic on this thread and just have info, and delete anything else! I will be updating as I find time! As of now, thanks to Socalman because all I am doing is copying his hard work  ****************************************************************************************************** Misc Info and the Basics: BUYERS GUIDE AND PRE-PURCHASE CHECKLIST (What should I look for in a C4?) http://www.corvettephotographs.com/c...repurchase.htm http://tinyurl.com/68ljjt https://www.thevettebarn.com/forums/c...html#post93667 https://www.thevettebarn.com/forums/c...html#post99123 HOOD WON'T RELEASE C4 SERVICE BULLETINS (FIND OUT WHAT SHOULD'VE BEEN FIXED OR WHAT HAS CHANGED) Checking Engine Codes - Post 3,4 Misc LT1 sensor/valve pictures - Post 5 Interior: How to: Recover your Center Console Cushion https://www.thevettebarn.com/forums/c...lots-pics.html Exterior: https://www.thevettebarn.com/forums/c...og-lights.html https://www.thevettebarn.com/forums/c...il-lights.html https://www.thevettebarn.com/forums/c...therstrip.html Clicking headlight fix Fuel System: Fuel Pump Replacement: - Post 2 Engine/Cooling system: https://www.thevettebarn.com/forums/c...ent-video.html https://www.thevettebarn.com/forums/c...tallation.html Diagnostics: https://www.thevettebarn.com/forums/n...streply&t=6300 Suspension: https://www.thevettebarn.com/forums/c...ont-rears.html How to lower your C4 Weights and Info: https://www.thevettebarn.com/forums/c...html#post93588 ----------------------------------------------------------------------------------------------------------------------------------- Basic Q and A to look at before posting up questions: Thanks Firevette Q. How do I fix XXXXX on my C4??? A. Buy a factory service manual (FSM). Its the best tool you can buy for your C4. It's best to consult your FSM before doing anything on your car that you are unfamiliar with. Q. My L98 C4 won't burn the tires. I thought Corvettes were fast, whats wrong with my car? A. You need to be sure all aspects of your car are where they should be. Check all normal tune up parts and replace as needed. Check all filters, including the fuel filter. Check timing. Most L98's like a bit more base timing. See how it runs from 6-10* btdc. Most stock L98's should have enough go to turn the tires over from a stop. Q. The airbag light on my 1990 is always on, what gives? A. The 1990 had a problem with corrosion between the airbag sensor and the frame. The sensor needs to be removed and mounting surfaces need to be cleaned, then replaced using dielectric grease. Consult FSM. Q.What kind of rear differential is in my C4? A. All 84's had a Dana 36. All 85-96 C4's with a standard transmission have a Dana 44. (including ZR1) All 85-96 C4's with an automatic transmission have a Dana 36. Gear ratios varied by year/option/transmission choice. Q.Can I remove the catylitic coverters and/or AIR pump from my L98 without setting off the service engine soon light? A. Yes Q. Can I remove the EGR from my L98 without a service engine soon light? A. No. EGR will need to be taken out of the tune. Q. Will C5 wheels fit my C4? A. Yes. They are bolt on for 88-96, 84-87 will require spacers. Q. Will a Holley Stealth Ram intake fit under my hood? A. No. Not in out of the box form. Q. There is coolant on my passenger floorboard and/or steam coming from my defroster vents. Where is it coming from? A. Your heater core probably just gave out and will need to be replaced. Good luck! Q.My headlights dont always flip up/down or get stuck sometimes, whats wrong? A. The headlight motors use nylon/plasic gears and bushings to drive the headlght assembly. These parts crack and wear out. This is normally the problem. You can buy the gears and bushings for a minimal cost and rebuild the motors yourself, or buy new/rebuilt motors at a much higher price. Q. Where is the battery on my C4? A. It is behind the driver side fender panel. This panel must be removed to R&R the battery. ----------------------------------------------------------------------------------------------------------------------------------- Last edited by Dogfish246; 02-09-2011 at 10:40pm. |
||||||

|

|
||||||
| The Following User Says Thank You to Dogfish246 For This Useful Post: |
|
01-20-2011, 3:13pm
|
#2 | ||||||
|
Vette Barn Regular

Join Date: Jan 2011
Location: Jenks, OK
Posts: 29
Thanks: 0
Thanked 5 Times in 2 Posts
Gameroom Barn Bucks: $660
|
Here's a fuel pump replacement write up I did a few years back, I'm too lazy to look over it but I know a couple of people used it to do their replacements.
The fuel pump is not a bad replacement. First disconnect the battery. Disconnect the fuel filler door, it is connected by a few torx screws. I think four but I'm at my office so I can't check right now. Unplug the wiring harness that connects to the fuel pump sending unit. There is a little rubber stop in there that you have to pull out with a pair of pliers. After that unscrew the gas cap and tape over the mouth with some duct tape. The fumes build up quickly so make sure you have your garage as open as you can and it is good to have a fan blowing fumes out the door. Pull out the rubber seal that goes over the tank. This is connected to a drain plug as well, so disconnect that. There are no screws or bolts on this, just fold it and pull it out. There should be three hoses going into the sending unit, the top one is your sending fuel line, and is held on by a pair of screw type hose clamps. The bottom left one goes to the charcoal cannister is held on by a spring hose clamp and is a pain to get off, I replaced this with a screw type hose clamp once I got it off. The bottom right is your fuel return line that sends gas back to the tank. Disconnect these three hoses, this was the hardest part for me, once you loosen up the clamps and get them out of your way it is easiest to pull straight back on these hoses, once you remove them put a little motor oil around the metal nozzles so that they're easier to put on and remove in the future. Next there are nine 9mm bolts on the sending unit. loosen and remove all of these, I sprayed them down with some PB Blaster the night before I did this to make sure they were good and loose. Once the bolts are removed grab the filler neck and pull the entire sending unit out. You might have to angle it slightly to get the fuel level float out. Duct Tape over the gas tank, again the fumes build up quickly, don't just put a rag in here. Disconnect wires that connect to the fuel pump. Once out you'll see the fuel pump at the bottom with the filter "sock" attached to it. Note the positioning of the sock. Disconnect the sock by grasping the metal ring at the top of it with a pair of pliars and twisting and pulling straight down. Disconnect the fuel pump by pushing up (towards the filler neck) until it pops out of the bottom bracket of the sending unit and then pulling down until it disconnects from the pulsator. The pulsator you can pull straight off, the AC Delco fuel pump I bought from Rock Auto included a small piece of fuel line and a pair of screw on clamps. Place both clamps on the metal fuel line then slide the fuel hose over the end of the pump, and the metal fuel line. Place the pump back into the bracket. Tighten the clamps on the fuel line, place the sock in the same alignment of the previous one by pushing it straight onto the fuel pump. Reconnect the wires. Slide the gasket over the sender unit and hold at the top, place the sender unit back into the tank being careful of the new sock and the float arm. Line up the gasket and finger tighten all the bolts. Tighten all the bolts, if you have a torque wrench, tighten to approx 15 lbs, if not just until it snugs, don't overtighten. Reconnect the fuel lines, remember the clamps. Reconnect the wiring harness, and try it out. Last edited by RedLS1GTO; 01-20-2011 at 10:48pm. Reason: Added disconnect battery. |
||||||
|
|
|
||||||
| The Following 3 Users Say Thank You to dclafleur For This Useful Post: |
|
01-20-2011, 11:25pm
|
#3 | ||||||
|
Barn Stall Owner #21


Join Date: Jan 2011
Location: Buena Park CA
Posts: 909
Thanks: 146
Thanked 237 Times in 139 Posts
Gameroom Barn Bucks: $850
|
How To Get Diagnostic Codes:
ALDL 201 (OBD I) From 1984 until the end of the 1993 model year a 12 pin ALDL was used. After that, a 16 pin ALDL connector was used. The 1994 and 1995 model year still used the OBD-I system even though they have 16 pin connectors. The 16 pin connector in the 1996 C4 is used for the much more complex OBD-II system and a scan tool is required to discover the OBD-II system's secrets. For the '84- end of '93, 12 pins:  Pin "B" is the diagnostic enable pin and pin "A" is ground. Grounding pin "B" to enable the diagnostic readout of the ECM/PCM. To recover the codes, short pins "A" and "B" together using a small section of electrical wire or paper clip. With the ignition turned OFF, short pins "A" and "B" on the ALDL. Turn IGN ON (but not to RUN). The "Check Engine" light (early C4s) or "SYS" light (later C4s) will flash a Code 12 (a single flash followed by two flashes) and will repeat three times (Flash (pause) Flash Flash (long pause), Flash (pause) Flash Flash (long pause), Flash (pause) Flash Flash (long pause). Code 12 is a delimiter or marker code to show where the error code string begins and ends. After the three Code 12 flashes, you will either get an error code (or codes) or you will get another string of Code 12 flashes if there are no trouble codes stored. All codes are repeated three times with a long pause between each code group (36 or Flash Flash Flash pause followed by six flashes, repeated three times, folowed by a long pause with any additional codes stored then flashed). The "Check Engine/System" light on with engine running means the condition(s) are currently present. If the light is not on during RUN operation, the limits were exceeded at some point in time and the event was recorded in memory, but the reading has since returned to the normal operating range. Remember to remove the shorting device from the connector after you have read the codes. Clearing the Codes To clear the codes from memory, remove the negative battery cable for a minimum of 10 seconds. Disconnecting the battery will clear all stored codes and and any stored memory (radio button presets, clock, trip odometer, average gas mileage memory, power seats). Your ECM/PCM computer will also have to relearn timing/mixture/exhaust emissions. Make absolutely certain the ignition key is turned OFF. If you connect the battery with the ignition switch ON, you can destroy the ECM/PCM module. For 1994 and later models, you will need to recover the codes using a special procedure involving the speedometer and the odometer as explained in the service manual or use a special diagnostic device known as a scan tool. For the '94 - '95, 16 pins (but still OBD I): 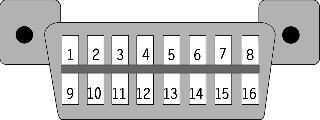 1996 to 2004 Corvette (OBD II): Turn IGN ON, ENG OFF. ON DIC, Press RESET button to clear any warning messages. Press and hold OPTIONS. While holding OPTIONS, press FUEL four times within 10 sec. Go into an AUTOMATIC mode to shows all parameters: PCM-TCS-RTD-BCM-IPC-RADIO-HVAC-LDCM-RDCM-SCM-RFA. If there are no problems, you will see "NO MORE CODES" on the ICP display. The computer displays two kinds of codes, CURRENT and HISTORY, designated "C" or "H". A CURRENT code indicates a malfunction is present in the system whose module is displaying data. A HISTORY code indicates a past problem. When the screen displays MANUAL DIAGNOSTICS, select the desired module by pressing the OPTIONS button to go forward or the TRIP button to go back. Press GAUGES to go forward or FUEL to go back. To exit the diagnostic mode at any time, press E/M. If you want to erase or CLEAR codes, press RESET. |
||||||
|
|
|
||||||
| The Following 3 Users Say Thank You to socalman For This Useful Post: |
|
01-20-2011, 11:27pm
|
#4 | ||||||
|
Barn Stall Owner #21
Join Date: Jan 2011
Location: Buena Park CA
Posts: 909
Thanks: 146
Thanked 237 Times in 139 Posts
Gameroom Barn Bucks: $850
|
Engine Trouble Codes:
1984: code 13 =1 flash followed by 3 flashes =>oxygen sensor code 14 =1 flash followed by 4 flashes =>coolant sensor code 15 =1 flash followed by 5 flashes =>coolant sensor code 21 = 2 flashes followed by 1 flash =>throttle position sensor code 22 = 2 flashes followed by 2 flashes=> throttle position sensor code 23 = 2 flashes followed by 3 flashes=> manifold air temp sensor code 24 = 2 flashes followed by 4 flashes=> vehicle speed sensor code 25 = 2 flashes followed by 5 flashes=> manifold air temp sensor code 32 =>egr system code 33 =>map sensor code 34 =>maf sensor code 35 => idle air control code 41 => cylinder select error code 42 => electronic spark control code 43 => electronic spark control code 44 => lean exhaust code 45 => rich exhaust code 51 => PROM code 52 => fuel calpak code 53 => system over voltage code 54 => fuel pump circuit code 55 => ecm code 62 => oil temp 1985-1991 Code #12: Normal No Codes. Code #13: Open Oxygen Sensor Circuit. Code #14: Coolant Sensor Circuit Low. Code #15: Coolant Sensor Circuit High. Code #21: Throttle Position Sensor High. Code #22: Throttle Position Sensor Low. Code #23: Manifold Air Temperature Circuit High. Code #24: Vehicle Speed Sensor. Code #25: Manifold Air Temperature Circuit Low. Code #32: EGR System Failure. Code #33: Mass Air Flow Sensor High. Code #34: Mass Air Flow Sensor Low. Code #36: Mas Air Flow Sensor Burn-Off Function Fault. Code #41: Cylinder Select Error. Code #42: Electronic Spark Timing. Code #43: Electronic Spark Control. Code #44: Lean Exhaust indication. Code #45: Rich Exhaust Indication. Code #46: Vehicle Anti Theft Fault. Code #51: Faulty Mem-Cal. Code #52: Fuel Calpak Missing. Code #52(1990-91 Corvette Only): Engine Oil Temperature Sensor Low. Code #53: System Over Voltage. Code #54: Fuel Pump Circuit Low Voltage. Code #55: Defective ECM. Code #62: Engine Oil Temperature Sensor Circuit High 1992-1993 Code #12: Normal No Codes. Code #13: Left Oxygen Sensor Circuit. Code #14: Coolant Temperature Sensor Circuit High. Code #15: Coolant Temperature Sensor Circuit Low. Code #16: Opti-Spark Ignition Timing System.( Low Pulse) Code #21: Throttle Position Sensor Circuit High. Code #22: Throttle Position Sensor Circuit Low. Code #23: Intake Air Temperature Sensor Circuit Low. Code #24: Vehicle Speed Sensor Circuit. Code #25: Intake Temperature Sensor Circuit High. Code #26: Quad-Driver Module #1 Circuit. Code #27: Quad-Driver Module #2 Circuit. Code #28: Quad-Driver Module #3 Circuit. Code #32: Exhaust Gas Recirclation Circuit. Code #33: Manifold Absolute Pressure Sensor Circuit Low. Code #34: Manifold Absolute Pressure Sensor Circuit High. Code #36: Opti-Spark Ignition Timing System. (High Resolution Pulse.) Code #41: Electronic Spark Timing Circuit Open. Code #42: Electronic Spark Timing Circuit Grounded. Code# 43: Electronic Spark Control Circuit. Code #44: Left Oxygen Sensor Circuit Lean. Code #45: Left Oxygen Sensor Circuit Rich. Code #51: Mem-Cal Error. Code #52: Engine Oil Temperature Sensor Circuit Low. Code #53: System Voltage. Code #55: Fuel Lean Monitor. Code #56: Vacuum Sensor Circuit. Code #61: Secondary Port Throttle Valve System. Code #62: Engine Oil Temperature Sensor Circuit High. Code #63: Right Oxygen Sensor Circuit Open. Code #64: Right Oxygen Sensor Circuit Lean. Code #65: Right Oxygen Sensor Circuit Rich. Code #66: A/C Pressure Sensor Circuit Open. Code #67: A/C Pressure Sensor Circuit. (Sensor or A/C Clutch Circuit Problem) Code #68: A/C Relay Circuit Shorted. Code #69: A/C Clutch Circuit. Code #72: Gear Selector Switch Circuit. 1994-1996 DTC #11: Malfunction Indicator Lamp Circuit. DTC #13: Bank #1 Heated Oxygen Sensor #1 Circuit: DTC #14: Engine Coolant Temperature Sensor Circuit Voltage Low. DTC #15: Engine Coolant Temperature Sensor Circuit Voltage High. DTC #16: Distributor Ignition System Low Pulse. DTC #18: Injector Circuit. DTC #21: Throttle Position Sensor Circuit Voltage High. DTC #22: Throttle Position Sensor Circuit Voltage Low. DTC #23: Intake Temperature Sensor Circuit Voltage High. DTC #24: Vehicle Speed Sensor Circuit. DTC #25: Intake Air Temperature Sensor Circuit Voltage Low. DTC #26: Evaporative Emission Canister Purge Solenoid Valve Circuit. DTC #27: EGR Vacuum Control Signal Solenoid Valve Circuit. DTC #28: Transmission Range Pressure Switch Assembly Fault. DTC #29: Secondary Air Injection Pump Circuit. DTC #32: Exhaust Gas Recalculation. DTC #33: Manifold Absolute Pressure Sensor Circuit High. DTC #34: Manifold Absolute Pressure Sensor Circuit Low. DTC #36: Distributor Ignition System High Pulse. DTC #37: Brake Switch Stuck On. DTC #38: Brake Switch Stuck Off. DTC #41: Ignition Control Circuit Open. DTC #42: Ignition Control Circuit Shorted. DTC #43: Knock Sensor Circuit. DTC #44: Bank 1 LF Heated Oxygen Sensor #1 Circuit Lean. DTC #45: Bank 1 LF Heated Oxygen Sensor #1 Circuit Rich. DTC #47: Knock Sensor Circuit Or Module Missing. DTC #48: Mass Air Flow Sensor Circuit. DTC #50: System Voltage Low. DTC #51: EEPROM Programming Error. DTC #52: Engine Oil Temperature Sensor Circuit Voltage Low. DTC #53: System Voltage Low. DTC #55: Fuel Lean Monitor. DTC #58: Transmission Fluid Temperature Sensor Circuit Low. DTC #59: Transmission Fluid Temperature Sensor Circuit High. DTC #62: Engine Oil Temperature Sensor Circuit Voltage Low. DTC #63: Bank 2 RF Heated Oxygen Sensor #1 Circuit Open. DTC #64: Bank 2 RF Heated Oxygen Sensor #1 Circuit Lean. DTC #65: Bank 2 RF Heated Oxygen Sensor #1 Circuit Rich. DTC #66: A/C Refrigerant Pressure Sensor Circuit Open. DTC #67: A/C Pressure Sensor Circuit Sensor or A/C Clutch. DTC #68: A/C Relay Circuit. DTC #69: A /C Clutch Circuit. DTC #70: A/C Clutch Relay Driver Circuit. DTC #72: Vehicle Speed Sensor Loss. DTC #73: Pressure Control Solenoid Circuit Current Error. DTC #74: Traction Control System Circuit Low. DTC #75: Transmission System Voltage Low DTC #77: Primary Cooling Fan Relay Control Circuit. DTC #78: Secondary Cooling Fan Relay Control Circuit. DTC #79: Transmission Fluid Overtemp. DTC #80: Transmission Component Slipping. DTC #81: Transmission 2-3 Shift Solenoid Circuit. DTC #82: Transmission 1-2 Shift Solenoid Circuit. DTC #83: Torque Converter Solenoid Voltage High. DTC #84: 3-2 Control Solenoid Circuit.(Auto Only). DTC #84: 2nd And 3rd Gear Blockout Relay Control Circuit. DTC #85: Transmission TCC Stock On. DTC #90: Transmission TCC Solenoid Circuit. DTC #91: One To Four Upshift Lamp(Manual Only). DTC #97: VSS Output Circuit. DTC #98: Tachometer Output Signal Voltage Wrong. |
||||||
|
|
|
||||||
| The Following 5 Users Say Thank You to socalman For This Useful Post: |
|
01-23-2011, 8:03pm
|
#5 | ||||||
|
A Real Barner


Join Date: Jan 2011
Location: Oklahoma City, OK
Posts: 4,030
Thanks: 1,992
Thanked 1,418 Times in 706 Posts
Gameroom Barn Bucks: $882805
|
This shows pics of the sensors and valves on an LT1 (93 to be specific) I can add other years/engines if anyone wants to send them to me. Sometimes when we talk about them it helps to know what it looks like, where it is and if it can still be bought new.
I'm showing the FSM name, pg and part # found in the 93 FSM, and the Autozone part # and price. I'm not advertising for AZ so if this is against forum rules mods let me know and I'll delete. Coolant gage sensor assy pg 6a1b-3 #225 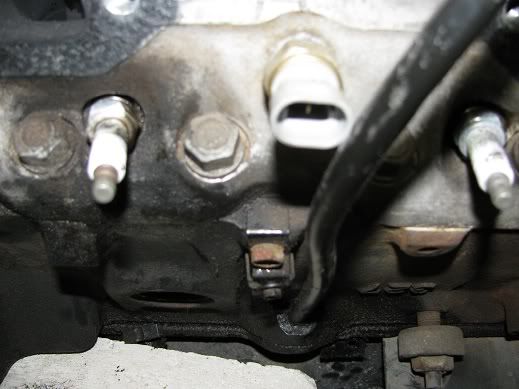 EGR valve assy pg 6a1b-3 #204 autozone 51.99 EGR1082 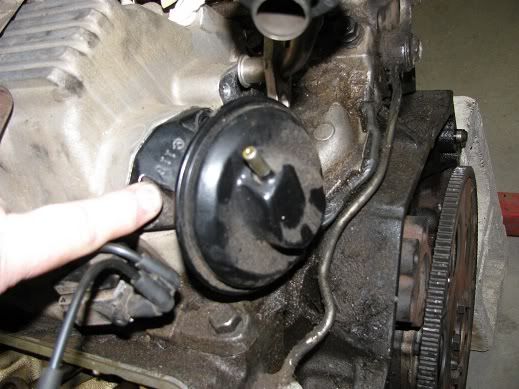 Evaporative emission canister purge solenoid valve assy pg 6a1b-3 #196 Autozone 22.99 PV118 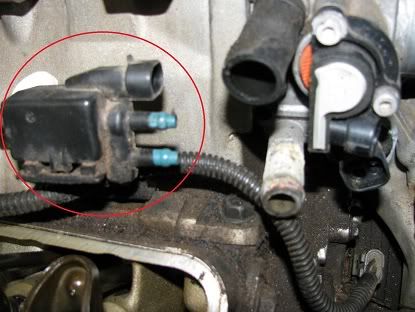 EGR control valve relay solenoid assy pg 6a1b-3 #193 Autozone 24.99 EVS34 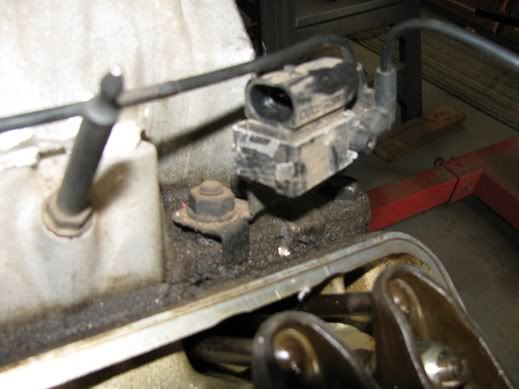 Secondary air injection check valve assy pg 6a1b-3 #11 Autozone 12.99 779-2929  Engine oil level switch sensor assy pg 6a1b-5 #178 Autozone 30.99 SU1316 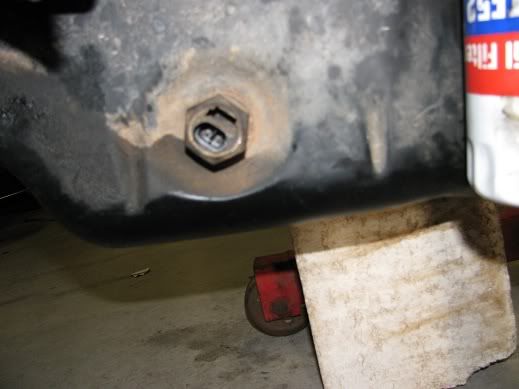 Fuel pump and engine oil pressure indicator switch sensor assy pg 6a1b-5 #165 Autozone 10.99 PS206 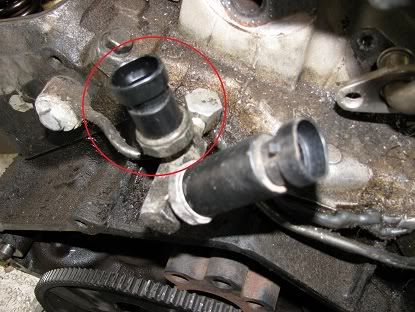 Engine oil pressure indicator switch assy pg 6a1b-5 #166 Autozone 22.99 PS168 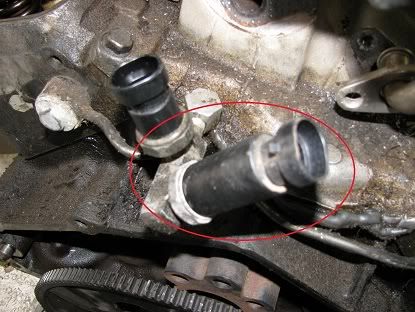 Engine oil temperature gage sensor assy pg 6a1b-5 #169 Autozone 33.99 TU225  Knock sensor assy pg 6a1b-5 #171 Autozone 31.99 SU150 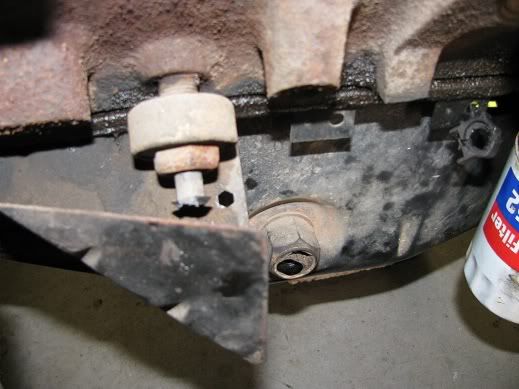 Crancase vent valve assy pg 6a1b-3 #207 NO PIC Manifold absolute pressure (MAP) sensor pg 6e3-c1-4 book 2 Autozone 35.99 SU105 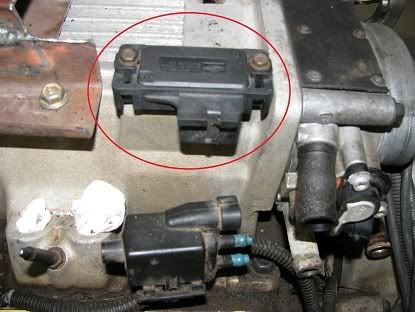 Idle air control valve assy pg 6e3-c2-4 book 2 Autozone 24.99 AC114 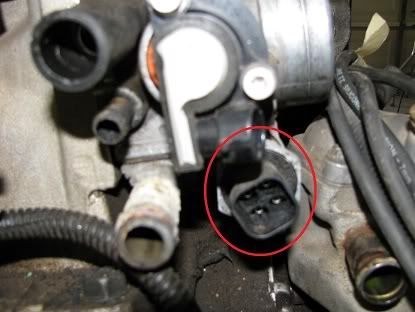 Throttle position sensor pg 6e3-c2-4 book 2 Autozone 21.99 TPS115 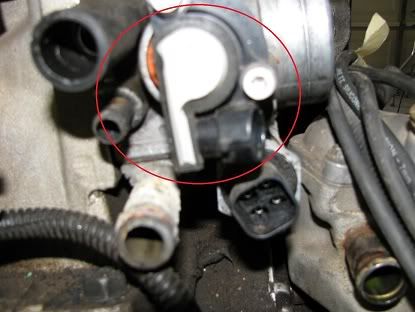
|
||||||
|
|
|
||||||
| The Following User Says Thank You to C4fan For This Useful Post: |
|
10-13-2012, 5:09pm
|
#6 | ||||||
|
Vette Barn nOOb
|
Does anyone have any suggestions on finding the reason for a malfunctioning high level brake light on a 88 corvette coupe. The bulbs test okay, getting an apparent ground at the light fixture. Any thoughts? HRunning
|
||||||
|
|
|
||||||
|
|
|
Support the Barn: |
Download the Mobile App; |
Follow us on Facebook: |
||
|
|
|
|


 Submit to Reddit


